> ## Documentation Index
> Fetch the complete documentation index at: https://docs.fizen.io/llms.txt
> Use this file to discover all available pages before exploring further.

# Manual Installation

> Install your Fizen eSIM by QR code or by entering the activation code manually — step-by-step for iOS and every Android brand.

<Note>
  Most users don't need this page — the [one-click activation link](/help-center/fizen-esim/how-to-buy-an-esim#activate-in-one-click) installs everything automatically. Use manual installation when you're installing the eSIM on a different phone than the one you bought it on (each eSIM still works on **one device only**), the link doesn't open, or you prefer QR/code entry.

  Your **QR code**, **SM-DP+ Address**, and **Activation Code** are all on the **eSIM detail screen** in the Fizen App, and in your confirmation email.
</Note>

<Tabs>
  <Tab title="iOS">
    ### Via QR code

    <Steps>
      <Step title="Open Settings → Cellular (or Mobile Data)">
        <Frame>
          <img src="https://mintcdn.com/fizenltd/iDxOLjP-BJLAH9wq/images/esim/ios-1.png?fit=max&auto=format&n=iDxOLjP-BJLAH9wq&q=85&s=cbbef48f9e25fba87ec3233198b8c29f" alt="iOS Settings with Cellular highlighted" width="220" data-path="images/esim/ios-1.png" />
        </Frame>
      </Step>

      <Step title="Tap Add eSIM">
        <Frame>
          <img src="https://mintcdn.com/fizenltd/iDxOLjP-BJLAH9wq/images/esim/ios-2.png?fit=max&auto=format&n=iDxOLjP-BJLAH9wq&q=85&s=47af2bb12350f1aa096b1c44211a6098" alt="Cellular screen with Add eSIM highlighted" width="220" data-path="images/esim/ios-2.png" />
        </Frame>
      </Step>

      <Step title="Choose 'Use QR Code'">
        <Frame>
          <img src="https://mintcdn.com/fizenltd/iDxOLjP-BJLAH9wq/images/esim/ios-3.png?fit=max&auto=format&n=iDxOLjP-BJLAH9wq&q=85&s=681ab3a953313052c82073cee72728b9" alt="Set Up Cellular screen with Use QR Code highlighted" width="220" data-path="images/esim/ios-3.png" />
        </Frame>
      </Step>

      <Step title="Scan the QR code from the eSIM detail screen">
        You'll need the QR code displayed on another screen or printed out, so this phone's camera can scan it. (The eSIM still installs on this phone only.)

        <Frame>
          <img src="https://mintcdn.com/fizenltd/iDxOLjP-BJLAH9wq/images/esim/ios-4.png?fit=max&auto=format&n=iDxOLjP-BJLAH9wq&q=85&s=60cf42837b754c2a0a03c8a6f410735a" alt="iOS camera scanning an eSIM QR code" width="220" data-path="images/esim/ios-4.png" />
        </Frame>
      </Step>

      <Step title="Tap Continue and wait for activation">
        <Frame>
          <img src="https://mintcdn.com/fizenltd/iDxOLjP-BJLAH9wq/images/esim/ios-5.png?fit=max&auto=format&n=iDxOLjP-BJLAH9wq&q=85&s=75ee5761bbc1da22710c97e3c86a3ac0" alt="Activating eSIM progress screen" width="220" data-path="images/esim/ios-5.png" />
        </Frame>
      </Step>

      <Step title="Choose labels for your new eSIM line">
        <Frame>
          <img src="https://mintcdn.com/fizenltd/iDxOLjP-BJLAH9wq/images/esim/ios-6.png?fit=max&auto=format&n=iDxOLjP-BJLAH9wq&q=85&s=fa6cb1db9a4dfd350b58eb855ca73f8b" alt="Cellular Plan Label screen" width="220" data-path="images/esim/ios-6.png" />
        </Frame>
      </Step>

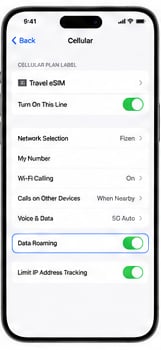
      <Step title="Enable 'Turn On This Line' and 'Data Roaming'">
        <Frame>
          <img src="https://mintcdn.com/fizenltd/iDxOLjP-BJLAH9wq/images/esim/ios-7.png?fit=max&auto=format&n=iDxOLjP-BJLAH9wq&q=85&s=275163b548af3cc111055627c40f50c0" alt="eSIM line settings with Data Roaming enabled" width="220" data-path="images/esim/ios-7.png" />
        </Frame>
      </Step>
    </Steps>

    ### Enter details manually

    <Steps>
      <Step title="Open Settings → Cellular → Add eSIM → 'Use QR Code'">
        Same path as the QR flow (screens 1–3 above).
      </Step>

      <Step title="Tap 'Enter Details Manually' at the bottom of the screen">
        <Frame>
          <img src="https://mintcdn.com/fizenltd/iDxOLjP-BJLAH9wq/images/esim/ios-4.png?fit=max&auto=format&n=iDxOLjP-BJLAH9wq&q=85&s=60cf42837b754c2a0a03c8a6f410735a" alt="Scan screen with Enter Details Manually link at the bottom" width="220" data-path="images/esim/ios-4.png" />
        </Frame>
      </Step>

      <Step title="Paste the SM-DP+ Address and Activation Code">
        Copy both from the eSIM detail screen in the Fizen App, then tap **Next**.

        <Frame>
          <img src="https://mintcdn.com/fizenltd/iDxOLjP-BJLAH9wq/images/esim/ios-manual-entry.png?fit=max&auto=format&n=iDxOLjP-BJLAH9wq&q=85&s=cad6bb07083fadf0ca337d1eca870e85" alt="Enter Activation Details screen with SM-DP+ Address and Activation Code fields" width="220" data-path="images/esim/ios-manual-entry.png" />
        </Frame>
      </Step>

      <Step title="Wait for activation, choose labels, then enable 'Turn On This Line' and 'Data Roaming'">
        Same as screens 5–7 in the QR flow above.
      </Step>
    </Steps>

    <Info>
      If you can't connect after installing, configure the **Cellular Data Network APN** settings:

      <Frame>
        <img src="https://mintcdn.com/fizenltd/iDxOLjP-BJLAH9wq/images/esim/ios-8.png?fit=max&auto=format&n=iDxOLjP-BJLAH9wq&q=85&s=f6573714950d5c3e4a00ebd77b56238b" alt="iOS Cellular Data APN settings screen" width="220" data-path="images/esim/ios-8.png" />
      </Frame>
    </Info>
  </Tab>

  <Tab title="Samsung">
    ### Via QR code

    <Steps>
      <Step title="Open Settings → Connections → SIM manager">
        <Frame>
          <img src="https://mintcdn.com/fizenltd/iDxOLjP-BJLAH9wq/images/esim/android-1.png?fit=max&auto=format&n=iDxOLjP-BJLAH9wq&q=85&s=c03c883fd0cf81651bfdda50e7133c32" alt="Samsung Connections screen with SIM manager highlighted" width="220" data-path="images/esim/android-1.png" />
        </Frame>
      </Step>

      <Step title="Tap Add eSIM → 'Scan QR code'">
        <Frame>
          <img src="https://mintcdn.com/fizenltd/iDxOLjP-BJLAH9wq/images/esim/android-2.png?fit=max&auto=format&n=iDxOLjP-BJLAH9wq&q=85&s=45c6272701a5cc75fd9f617ade131fba" alt="Add eSIM screen with Scan QR code highlighted" width="220" data-path="images/esim/android-2.png" />
        </Frame>
      </Step>

      <Step title="Scan the QR code">
        <Frame>
          <img src="https://mintcdn.com/fizenltd/iDxOLjP-BJLAH9wq/images/esim/android-3.png?fit=max&auto=format&n=iDxOLjP-BJLAH9wq&q=85&s=b24dcc8316aef32b9e10a508cc029f6c" alt="Scan QR code screen" width="220" data-path="images/esim/android-3.png" />
        </Frame>
      </Step>

      <Step title="Tap Download (or Add)">
        <Frame>
          <img src="https://mintcdn.com/fizenltd/iDxOLjP-BJLAH9wq/images/esim/android-4.png?fit=max&auto=format&n=iDxOLjP-BJLAH9wq&q=85&s=ebdd99c8a78929c63e7a1defdd04e2cb" alt="Fizen eSIM download confirmation screen" width="220" data-path="images/esim/android-4.png" />
        </Frame>
      </Step>

      <Step title="Wait while the eSIM downloads, then tap Done">
        <Frame>
          <img src="https://mintcdn.com/fizenltd/iDxOLjP-BJLAH9wq/images/esim/android-5.png?fit=max&auto=format&n=iDxOLjP-BJLAH9wq&q=85&s=4ce4b714c49496ed2a9eef01afe9c356" alt="Downloading eSIM progress screen" width="220" data-path="images/esim/android-5.png" />
        </Frame>

        <Frame>
          <img src="https://mintcdn.com/fizenltd/iDxOLjP-BJLAH9wq/images/esim/android-6.png?fit=max&auto=format&n=iDxOLjP-BJLAH9wq&q=85&s=f764359ec3b1c27d2a436c91e97e40dc" alt="eSIM added confirmation screen" width="220" data-path="images/esim/android-6.png" />
        </Frame>
      </Step>
    </Steps>

    ### Enter code manually

    <Steps>
      <Step title="Open Settings → Connections → SIM manager" />

      <Step title="Tap Add eSIM → 'Enter activation code'" />

      <Step title="Enter the activation code and tap Next" />

      <Step title="Tap Download" />

      <Step title="Wait while the eSIM downloads, then tap Done" />
    </Steps>
  </Tab>

  <Tab title="Pixel">
    ### Via QR code

    <Steps>
      <Step title="Open Settings → Network & Internet" />

      <Step title="Tap SIMs → Add eSIM" />

      <Step title="Tap 'Download a SIM instead' → Next" />

      <Step title="Scan the QR code and tap Download" />

      <Step title="Wait while the eSIM downloads, then tap Done" />
    </Steps>

    ### Enter code manually

    <Steps>
      <Step title="Open Settings → Network & Internet → SIMs" />

      <Step title="Tap Add eSIM → 'Download a SIM instead'" />

      <Step title="Tap 'Need help?' → 'Enter activation code'" />

      <Step title="Enter the activation code, confirm and download" />

      <Step title="Finish setup" />
    </Steps>

    <Info>
      The screens look very similar to the Samsung flow pictured in the Samsung tab: scan → download → done.
    </Info>
  </Tab>

  <Tab title="Xiaomi">
    ### Via QR code

    <Steps>
      <Step title="Open Settings → SIM cards & mobile networks" />

      <Step title="Tap eSIM → Add eSIM" />

      <Step title="Tap 'Use QR Code' and scan the QR code" />

      <Step title="Tap Download (or Add)" />

      <Step title="Wait while the eSIM downloads, then tap Done" />
    </Steps>

    ### Enter code manually

    <Steps>
      <Step title="Open Settings → SIM cards & mobile networks → eSIM" />

      <Step title="Tap Add eSIM → 'Enter activation code'" />

      <Step title="Enter the activation code" />

      <Step title="Download the eSIM and complete setup" />
    </Steps>

    <Info>
      The screens look very similar to the Samsung flow pictured in the Samsung tab: scan → download → done.
    </Info>
  </Tab>

  <Tab title="Oppo / Vivo">
    ### Via QR code

    <Steps>
      <Step title="Open Settings → Mobile network (or SIM card & mobile network)" />

      <Step title="Tap eSIM → Add eSIM" />

      <Step title="Tap 'Use QR Code' and scan the QR code" />

      <Step title="Tap Download (or Add)" />

      <Step title="Wait while the eSIM downloads, then tap Done" />
    </Steps>

    ### Enter code manually

    <Steps>
      <Step title="Open Settings → Mobile Network → eSIM" />

      <Step title="Tap Add eSIM" />

      <Step title="Enter the activation code" />

      <Step title="Download the eSIM and complete setup" />
    </Steps>

    <Info>
      The screens look very similar to the Samsung flow pictured in the Samsung tab: scan → download → done.
    </Info>
  </Tab>

  <Tab title="Honor / Huawei">
    ### Via QR code

    <Steps>
      <Step title="Open Settings → Mobile network" />

      <Step title="Tap SIM Management → Add eSIM" />

      <Step title="Tap 'Use QR Code' and scan the QR code" />

      <Step title="Tap Download (or Add)" />

      <Step title="Wait while the eSIM downloads, then tap Done" />
    </Steps>

    ### Enter code manually

    <Steps>
      <Step title="Open Settings → Mobile Network → SIM Management" />

      <Step title="Tap Add eSIM" />

      <Step title="Enter the activation code" />

      <Step title="Download the eSIM and complete setup" />
    </Steps>

    <Info>
      The screens look very similar to the Samsung flow pictured in the Samsung tab: scan → download → done.
    </Info>
  </Tab>

  <Tab title="Other Android">
    ### Via QR code

    <Steps>
      <Step title="Open Settings → Connections (or Network & Internet)" />

      <Step title="Tap SIMs, SIM Manager, or eSIM → Add eSIM">
        <Frame>
          <img src="https://mintcdn.com/fizenltd/iDxOLjP-BJLAH9wq/images/esim/android-2.png?fit=max&auto=format&n=iDxOLjP-BJLAH9wq&q=85&s=45c6272701a5cc75fd9f617ade131fba" alt="Add eSIM screen with Scan QR code option" width="220" data-path="images/esim/android-2.png" />
        </Frame>
      </Step>

      <Step title="Tap 'Use QR Code' and scan the QR code">
        <Frame>
          <img src="https://mintcdn.com/fizenltd/iDxOLjP-BJLAH9wq/images/esim/android-3.png?fit=max&auto=format&n=iDxOLjP-BJLAH9wq&q=85&s=b24dcc8316aef32b9e10a508cc029f6c" alt="Scan QR code screen" width="220" data-path="images/esim/android-3.png" />
        </Frame>
      </Step>

      <Step title="Tap Download (or Add)">
        <Frame>
          <img src="https://mintcdn.com/fizenltd/iDxOLjP-BJLAH9wq/images/esim/android-4.png?fit=max&auto=format&n=iDxOLjP-BJLAH9wq&q=85&s=ebdd99c8a78929c63e7a1defdd04e2cb" alt="eSIM download confirmation screen" width="220" data-path="images/esim/android-4.png" />
        </Frame>
      </Step>

      <Step title="Wait while the eSIM downloads, then tap Done">
        <Frame>
          <img src="https://mintcdn.com/fizenltd/iDxOLjP-BJLAH9wq/images/esim/android-6.png?fit=max&auto=format&n=iDxOLjP-BJLAH9wq&q=85&s=f764359ec3b1c27d2a436c91e97e40dc" alt="eSIM added confirmation screen" width="220" data-path="images/esim/android-6.png" />
        </Frame>
      </Step>
    </Steps>

    ### Enter code manually

    <Steps>
      <Step title="Open Settings → Network & Internet, Mobile Network, or Connections" />

      <Step title="Tap SIMs, SIM Manager, or eSIM" />

      <Step title="Tap Add eSIM (or Download a SIM)" />

      <Step title="Select 'Enter activation code' or 'Enter details manually'" />

      <Step title="Enter the activation code, confirm and download" />

      <Step title="Wait while the eSIM activates, then tap Done" />
    </Steps>
  </Tab>
</Tabs>

***

## After installing

Enable **Data Roaming** for the eSIM line and set it as your **mobile data** line when you arrive. Not connecting? Run the [2-minute troubleshooting checklist](/help-center/fizen-esim/troubleshooting) — and remember every plan is covered by the [1:1 Trip Guarantee](/help-center/fizen-esim/trip-guarantee).

## Keep reading

* [Which phones support eSIM: the complete list](https://blog.fizen.io/which-phones-support-esim-in-2026-the-complete-compatibility-list/)
* [Use an eSIM and a physical SIM together (dual SIM)](https://blog.fizen.io/can-you-use-esim-and-physical-sim-dual-sim-2026/)
* [Get a Fizen eSIM on fizen.io](https://fizen.io/esim)